Academics and RSEs have been very busy over the last few weeks coming up with creative solutions to move teaching and training online. My own under/post graduate GPU module Parallel Computing with GPUs has posed a significant problem. The course was designed to be run within the University of Sheffield’s High Specification teaching lab which is equipped with CUDA enabled GPUs. Moving this course online clearly requires a mechanism for students to access GPUs, without presenting a significant change to their current working practice (e.g. Visual Studio development in Windows). Ideally this cold be done using the university’s high performance computing facilities but the provision for GPUs is currently insufficient to support 100 students (although new GPUs are on the way). The obvious solution is to move this to the cloud however there are a number of challenges to solve which are the topic of this blog post which also serves as a reference for when I forget all of this in 6 months time.
Note: This blog specifically targets AWS as it is what I have used on the InstanceHub website which is part of the solution to Problem 3.
Creating an AWS image with accelerated Rendering and CUDA support is surprisingly more difficult than you might imagine. Having a GPU backed Windows instance still requires a driver install. The are some subtle things to watch out for here. E.g. Most GPU backed based cloud machine types use Tesla GPUs. These will support the NVIDIA CUDA driver but will run as headless devices using TCC driver mode in Windows. Essentially, this means that they will run CUDA applications and support debugging and profiling but won’t be involved in driving the display over remote desktop (or VNC). The built in windows display driver will instead be used which has OpenGL 1.0 support only.
The suggested method of providing accelerated rendering is to use an image with the NVIDIA Grid drivers pre installed. Most of these images are out dated so you can install the grid drivers yourself on a clean Tesla backed Windows instance. Perfect so this should provide GPU accelerated rendering with ability to run CUDA applications right? Yes, but with some restrictions including no debugging with NSight or profiling. Not so useful for a GPU course.
The final option is to install the CUDA driver (which will run in TCC mode) and then switch the driver mode to the windows driver display model (WDDM) rather than TCC. This mode is slightly less performant than TCC mode but is used for consumer and Quadro cards which drive displays as well as perform CUDA compute. Through trial and error this will only work on certain Tesla cards. K80s are not supported but M60s do. By running the following command (from the C:\Program Files\NVIDIA Corporation\NVSMI location as Administrator) you can put the M60 device into WDDM mode after a reboot.
nvidia-smi -g 0 -dm 0
Success. The WDDM mode with a M60 device supports CUDA (including Profiling and Debugging) and OpenGL hardware accelerated rendering!

For my GPU module I pre-installed a number of other useful pieces of software which include;
<CUDAInstaller>.exe -s visual_studio_integration_10.2 (from CUDA installation guide)In order to interact with students a screen sharing mechanism is required. Remote desktop is unsuitable for this as a user can not be logged in from two different locations. Similarly a VNC connection will log a remote desktop user out if the same user account is used. There are a number of commercial solutions available to provide remote assistance however Chrome has an excellent remote assistance plugin. As each Chrome user has their own profile it would require student to install the plugin before asking for help. Fortunately this can be automated using the following steps;
chrome.admx and google.admx files (from windows\admx in the zip file) to the instances c:\windows\policydefinitions folder.chrome.adml and google.adml files (from windows\admx\en-US in the zip file) to the instances c:\windows\policydefinitions\en-US folder.User Configuration\Administrative Templates\Google\Google Chrome\ExtensionsConfigure the list of force-installed apps and extensions and enable it. Click the Show button (under Options) and enter inomeogfingihgjfjlpeplalcfajhgai;https://clients2.google.com/service/update2/crx (the first part is the remote assistance extension ID and the second part os the update site where it is downloaded from). Click OK.c:\ChromeRemoteAssistance). To ensure this is installed for each user open Regedit and navigate to Create a string key in registry at: HKEY_LOCAL_MACHINE\Software\Microsoft\Windows\CurrentVersion\RunOnce. Create a new String Value and call it Chrome Remote Assistance. Set the value data to the location of the chromeremotedesktophost.msi file.By following the above, new users on the instance will be able to create a support request from https://remotedesktop.google.com/support/ By clicking the Generate Code button. This can then be shared with lab demonstrators so that they can share control of the machine while discussing via Google meet.
To obtain a Windows password for a newly created AWS Windows instance you select Get Windows Password by right clicking on the instance and then providing the key pair which was used to provision the instance initially. Behind the scenes AWS uses a tool called EC2Launch which runs on first boot and performs a bunch of tasks such as setting the computer name and Administrator password. Given that we want to create a reusable image once we have configured the instance (by installing software and drivers as in the previous section) there are some additional steps that we must take if we want to retain the ability to log in as an Administrator. First we must schedule EC2Launch to run on next startup. This can be achieved manually by running the following command from Powershell.
C:\ProgramData\Amazon\EC2-Windows\Launch\Scripts\InitializeInstance.ps1 -Schedule
Alternatively it can be scheduled by running EC2LaunchSettings (by typing EC2LaunchSettings in the start menu). Either of the two shutdown command will schedule EC2Config to run. The sysprep tool will perform some additional cleaning of the image detailed in the AWS docs. Before shutting down you can specify an option for the Administrator password. If this option is left as Random then you will be able to run Get Windows Password from the Ec2 Dashboard using your original key pair. You can also specify a specific Administrator password which is handy if you need to debug multiple machines based off the same image.
After shutting down you can now create an image of your instance from the EC2 Dashboard by right clicking the image and selecting “Image-> Create Image”. This will be queued and take a little while but once complete you have a reusable instance image which you can log into as an Administrator.
If like me you want to create specific user accounts for new instances based on the image then this can be achieved in the EC2 Launch Wizard using the User Data options in the Advanced section of the Configure Instance settings. User data for Windows instances are sets of commands which will be executed by EC2Launch during startup. They can be used to automate things like installations of software, they can also be used to create users. E.g. The following user data script will create a user called Paul with a password of 1cu46GtpMh0t, make that user an Administrator and allow the new user to connect via RDP. Care must be taken when using the net user /add command as passwords which doe not meet the password complexity requirements will be rejected.
<script>
net user /add Paul 1cu46GtpMh0t
net localgroup administrators Test /add
NET LOCALGROUP "Remote Desktop Users" Test /ADD
</script>
If something goes wrong with your user data then you have a persistent Administrator password so you can still access the instance and check the log file which is located at C:\ProgramData\Amazon\EC2-Windows\Launch\Log\UserdataExecution.log.
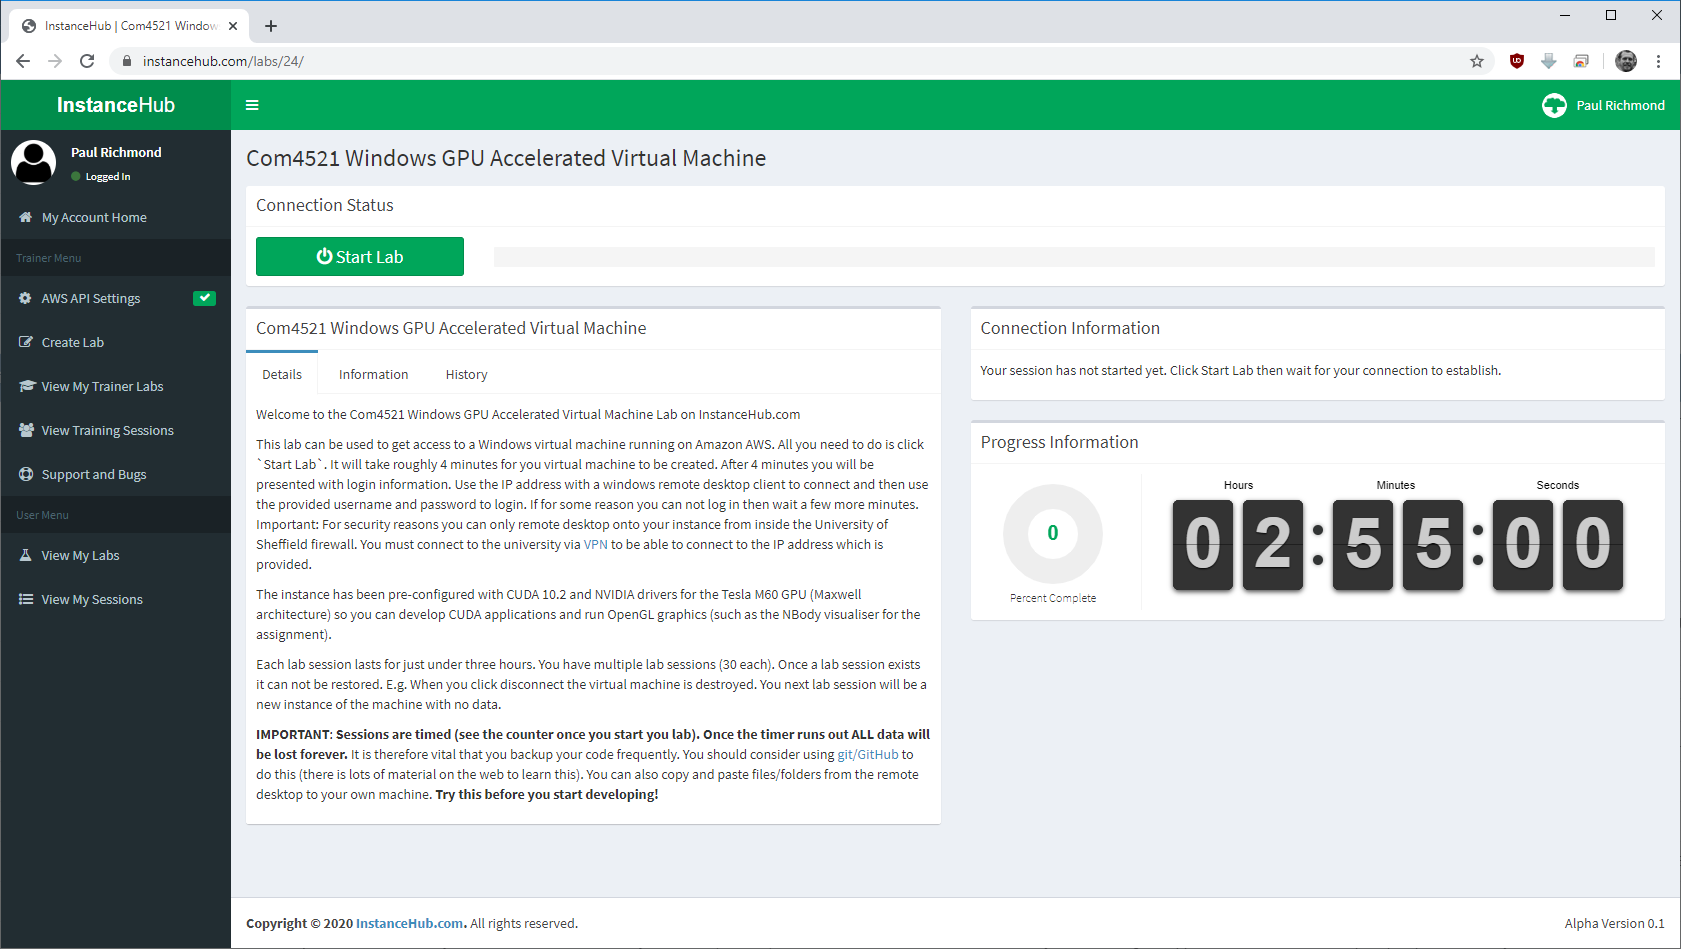
The final challenge and usually the most restrictive when it comes to cloud computing is the question of “How much will it cost?”. It is not possible to provide an instance to each student for the duration of the course as the costs of this would be outrageously high and utilisation would probably be poor (representing bad value for money). For my labs I need to be able to spin up ~100 GPU instances for a short time period (roughly 2 hours) and then ensure that they are shut down and incur no further cost. Fortunately I developed a solution to this some time ago, a website called InstanceHub. InstanceHub allow you to design a lab which includes;
Any user who signs up to the site and has been allocated a session on a lab will be able to click the Start Lab button. Behind the scenes the InstanceHub website will start and instance using the Boto3 API and use the User Data approach to create a disposable user account for each user. The User account will be displayed to users on the website so that they can connect. The above effective allows each student on my GPU course access to a disposable instance a fixed number of times putting a restriction on the spending budget.
For security the lab set up for my GPU course uses a VPC which restricts access to instances to those from within the University of Sheffield. Each student must therefore be on the VPN to access the instance via RDP.
All of the content described above was to provide an environment which closely matched what was previously available to students on campus. Personally I would prefer to provide Linux images and reproduce much of the above. Linux is less fussy about GPU drivers but more awkward to configure a visual desktop environment with VNC. We (the RSE team) have begun looking at this. Perhaps another blog post will follow at some point.
For queries relating to collaborating with the RSE team on projects: rse@sheffield.ac.uk
Information and access to Bede.
Join our mailing list so as to be notified when we advertise talks and workshops by subscribing to this Google Group.
Queries regarding free research computing support/guidance should be raised via our Code clinic or directed to the University IT helpdesk.
List of archived pages: Archive.